- July 4, 2020
- By neon31
- In Guest Post, Guides
- No Comment
- 0
- Tagged: Evergreen
Hearthstone Battlegrounds Guide by 11.5k MMR player
Hi all, I’m Pocky, an 11.5k MMR player on NA, who has peaked as high as Rank 131 on the leaderboards. Since I still have a way to improve myself, gonna make this geared towards newer and lower level players, but hopefully it can provide some nuggets of thought for players of all levels.
Like all card games Battlegrounds is a strategy game that is influenced by RNG, luck, however you want to refer to it. That means that to improve your gameplay you need to optimize your strategy accounting for the odds of different outcomes. Over time the random outcomes will equalize across all players and game knowledge and understanding of the game, and optimal plays will result in your climb. It’s important to establish this on the front end, because as with any strategy game, part of improving is analyzing your play. It’s important to know that you will not always win even if you play 100% correctly, but also that if you do play correctly, over time you will get better, and you can’t blame everything on the RNGods as it will only hold you back from rationally analyzing your play.
There are two phases of the game, the Tavern portion and the Combat phase. The only time you have control over the game is the Tavern phase, but we can impact the Combat phase with our positioning and Tavern phase decisions. For our purposes here it’s helpful to think of them as two separate pieces.
The Tavern phase is when you spend your gold each turn, which means that understanding it best requires you to understand the things you can spend your gold on, hero powers, minions, levels, and rolling/freezing, and to do that you have to understand your resources. The Combat phase is impacted mainly by your minion choices, positioning, and understanding your opponents and the game state. Combat will also influence your Tavern decisions. So with all that background established finally, let’s get into it.
Editors Note: We got permission by Pocky to post his guide.
Interested in checking out a Battlegrounds Stream? The owners of this website stream every Tuesday & Friday on Twitch – check them out:
Understanding Heroes
Picking a hero is the first decision you make in a game of BGs. Heroes are defined by their hero powers, of which there are many. Most importantly it’s important to know what each heroes hero power is, and what it does.
For a lot of low level players, simply always picking the statistically best hero would likely improve their win rate. For a lot of high level players, that also remains the case.
Beyond knowing what each hero power does, there’s a further level to understanding them. When you understand hero powers, you can tailor your play to each hero power. Each hero power can impact your game in a number of ways. Some in only one, others, like Yogg and Hooktusk can fall into multiple categories. In a general sense, these can be grouped as the following:
- Tempo (stats buffs)
- Consistency
- Value
- Greed
- Combat
» Tempo
Tempo heroes are heroes like Yogg, Kael’thas, Deryl, Millificent, or Rat King. Simply put they buff the stats on your minions which means all else being equal, your minions will typically be stronger than your opponents.
» Consistency
Consistency heroes are heroes like Hooktusk, Nozdormu, Malygos, and Elise. These heroes have ways of rerolling minions or taverns, so that when you are offered unideal options, you have a chance to try to get better minions, thus reducing the swing impacts of RNG, and more consistently having a solid board.
» Value
Value heroes are heroes that allow you to most efficiently use your gold. Value heroes are heroes like Rafaam, Maiev, Yogg, and Millhouse. They can all acquire minions at a reduced cost that allows them to often have more minions on board, or in hand, which opens up avenues for greedy leveling, or an increased chance at triples.
» Greed
Greed heroes are heroes like AFK, Alexstraza, Reno Jackson, Captain Eudora, and Sky Cap’n Kragg. These heroes effectively play without a hero power for a period, and in return get a power spike later on in the game. While they play without a hero power they are typically punished by taking high damage, but the power spike(s) allows them the opportunity to swing the game back into their favor, often times winning outright if they are able to make it to the point of their power spike healthily.
» Combat
Combat heroes are heroes like Lich King, Nefarian, and the Hero Formerly Known as Professor Putricide. They’re bad. I’m not going to discuss them until later.
Strengths and Weaknesses
Understanding the strengths of your hero power allows you to play towards it, as well as understand your weaknesses and how to play around it. There are a number of guides that people have written on specific heroes that go into far more depth on the details on different heroes, but in a general sense there are some tips that can help you organically think about different hero powers.
» Tempo
For tempo heroes, your strength is having strong minions, which is particularly impactful in the early game. A Kael’thas or Yogg on turns 3-7 are likely simply going to be stronger than most other heroes simply by having more stats on their minions. Will get into tempo a little more with understanding game state, but essentially since you will typically have a strong tempo early game, you are afforded the ability to occasionally play greedy, whether it’s by leveling faster as Yogg, or perhaps holding for an extra turn to dance more as Deryl. Many of these heroes fall off later as the stats buffs become less relevant as other players gain the ability to buff their minions with battlecries and the like, so pressing your advantage early to gain further advantage puts you in a better position to win. If you’ve hit your Rat King hero power in 4 of your last 5 turns, then you may consider simply leveling early, simply because you’ve gotten a free 5/10 in stats from your hero power. Playing greedy in these situations can accelerate your advantage, and punish other players, diminishing your relative weaknesses in the later game.
» Consistency
Consistency heroes can see a few different impacts on their play. For one, similar to tempo heroes, they’ll often have strong boards early game by virtue of having better minions. Nozdormu is a great example of this. On turn 1 instead of picking the best of 3 minions, you get to pick the best of 6 minions. So instead of having a top 33% minion, you instead have a top 17% minion. The same applies to other turns where just by quantity you’ll on average be getting better minion choices to make your board as strong as possible. While stronger minions early don’t quite give you the same tempo early, the extra consistency also gives you a benefit in a higher likelihood to run into triples, which makes it more conducive to pick up pairs when you’re playing these heroes. Since you can have a relatively strong board by consistently getting good minions, oftentimes you’ll be afforded the opportunity to hold onto pairs and level aggressively to triple into higher tier minions that can either give you a direction, or give you a strong power spike.
» Value
Value heroes can get minions for cheaper, which means the main thing is to consider is how to best utilize the extra resources it affords you. the main thing is to consider how to best utilize the extra resources it affords you. The most notable example of this is the “Rafaam curve” which entails delaying your first level until your 6 gold turn, in favor of utilizing your hero power to provide you tempo earlier. On your 7 gold turn you can catch up to the normal curve (we will discuss later) by hero powering and leveling, and can further aggressively level in the same manner afterwards. Yogg has a similar advantage when he gets a token start because he can have a full board on 7 gold, and then can sell level and hero power on the following turns, if there is a strong board. Maiev plays similar to Rafaam except on a delay, but you can choose what you pick up, meaning you can prioritize pairs. Millhouse is representative of what all value heroes strive to do in buying many minions, and using gold where possible to level aggressively, essentially maximizing gold efficiency.
» Greed
Greed heroes are probably the most well known because many consider them the most fun. We all love high rolling. Greed heroes usually play without a hero power early, for a later payoff. Usually this payoff comes at the expense of your heroes health, which means generally you play in one of two ways, typically decided by your game state. The first and typically best is to play as conservatively as possible, and as close to a standard curve as you can. You don’t need to be greedy because you have natural greed built in, and that payoff will make up for your earlier losses. The other situation is recognizing when the benefits of playing conservatively will not pay off for you. The best example of this when you are offered a very poor shop on turn 3, an option you have is to look at the situation and say I’m likely to lose regardless of if I buy minions here, and resign to taking the damage, but increasing your high roll potential by getting to a higher level faster. Greed heroes are really designed around managing your non-gold resource, health, optimally.
As with all things, a good foundation of play is playing to your strength and minimizing your weaknesses, and taking a moment to understand the strengths and weaknesses of each hero you play will make you a better player.
Understanding Tempo, Minions, and Direction
Minions. They’re what you buy. Minions are the foundation of Battlegrounds, as they’re what do the battling. Minions can have stats and effects. The stats are made up of attack and health, and the effects can be a range. Each minion can also have a tribe, consisting of Beasts, Demons, Dragons, Mechs, Murlocs, and Pirates. Some effects have synergy with specific tribes. Each minion costs 3 gold to buy (usually), and so buying minions will typically make up most of your gold spent in a game.
Each battle consists of your minions facing off against your opponents, and whoever has the strongest minions typically wins. When you win you do damage to your opponent, which is how you win the game. Ideally your goal is to win every single fight. To do so you need to have the strongest minions. Acquiring the strongest minions is called playing for tempo.
Tempo in a general sense is buying minions to optimize your chances of winning the next fight. Typically this revolves around buying the minions with the best stats possible. Sometimes this is naked stats, but sometimes it’s based on what’s currently on your board. Murloc Warleader can be a naked 3/3 or he could effectively be adding 6 attack to 3 other murlocs already on your board. Menagerie Magician can be a 4/4 on it’s own, or it can be as strong as a 10/10 in total stats with a full buff.
When you need or want to win fights, you should be playing for tempo. Playing for tempo, typically lets you play on curve, which will be our next topic. Often times playing for tempo means that you’ll naturally start taking advantage of tribal synergies, which begins what we call our direction. If your board is made up of 5 pirates early on, you will start looking for minions that benefit pirates, as you move to late game. As you get later on in the game, if you have a direction, you’ll be looking for “build-around” cards that fit your direction. Goldrinn or Mama Bear for Beasts, Brann for Murlocs, Kalecgos and Nadina for Dragons etc. If you don’t have a direction, then it’s important to play for tempo so that you can get to Tier 5 and 6 where most of the “build-around” cards reside. This allows you to pick one of them up and then have a direction for your late game build. If you have a few deathrattles and a few murlocs, you’ll probably want to get to 5 as healthy as possible, so that you can look for a Brann or a Baron. Depending on which one you find that will determine whether you pursue a deathrattle comp or the murlocs.
Without going into details on every minion, it’s important to understand which minions are strong on stats and tempo (and when), and which minions give you a direction, and are worth building around. These aspects will determine what minions you buy throughout the game.
Understanding the Curve
Understanding the curve is essentially understanding levels, and more specifically when to level. The table below is a breakdown of some basic statistics on each level.
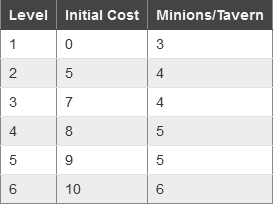
Of course, most importantly is that each Tier offers you stronger minions than the last, so it’s important to know what minions are on what tier, so that when you’re looking for specific minions you know what tier to be on. If you’re playing mechs or divine shield it’s fine to stay on 4 for longer than normal. This is especially relevant when you triple. If you’re playing murlocs, you’re going to specifically want to triple into Tier 3, 5, and late game 6s, etc.
So we know why we level, how much it costs to level, etc. The bit that people struggle with the most is when to level. The answer to that typically is with “the curve”. So what is “the curve”? It’s the standard pattern of leveling that represents your leveling curve, that is followed by most heroes as it is the most gold efficient way to level as quickly as possible while maximizing tempo and health.
» Your standard curve typically is as follows
- 3 Gold turn: Buy
- 4 Gold turn: Level 2(4)
- 5 Gold turn: Sell, Buy 2
- 6 Gold turn: Buy 2
- 7 Gold turn: Buy, Level 3 (4)
- 8 Gold turn: Sell, Buy 3 or Roll twice, Buy 2 (get to 7 minions)
- 9 Gold turn: Level 4 (6), Roll, Sell, Buy
- 10 Gold turn: Level 5 (8), Sell, Buy
It’s helpful to have this in the back of your mind because there’s only two ways to play. You’re either on the curve or you’re not. That’s a little bit too simplistic, but it’s easy to think of it that way, because by framing it in that way, we can easily think about when we decide to deviate from the curve.
» Deviating from the Curve
So when do you want to deviate from the curve?
- To maximize your hero power
- To stay alive or conserve HP
- To greed when you’re in a strong position
- Shop too good/too bad
The first point is commonly seen in the aforementioned “Rafaam curve”.
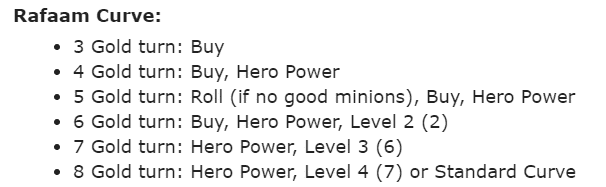
Essentially this curve is valuable because it allows you to take advantage of your hero power early, and return to the standard curve so that you don’t fall behind in the late game. You make up for not leveling by getting tempo in the form of minions for 1 gold, but in addition to getting tempo, you also increase the chances that you’ll run into triples, that will have a greater payoff later when you’re able to level greedily. Pyramad is another example of using the Rafaam curve to utilize your hero power. The tempo lost in T2 minions is made up by the tempo gain of directing +4 hp on your minions early. The later payoff is essentially that those health buffs are permanent, so a strong minion can carry you through the midgame while you get back onto curve or potentially ahead of curve. Eudora is another hero that delays levels early to utilize hero power, whether that’s playing on Rafaam curve, or you hero power on turn 1. As a greedy hero, you’re sacrificing early HP and tempo for tempo recovery and a power spike on turn 4 or 5, and get an extra round of hero powers in the game.
Staying alive is a bit more straightforward. We all have those games where it seems nothing is going our way. We can’t get good minions in the shop, we can’t win a fight for our lives, and we’re almost dead on Turn 7. In this case the outcome of potentially taking first place is almost entirely gone, a win for us now is simply losing the least MMR, whether that’s a top 4, or a 6th place rather than 8th. We don’t level on curve because we need to stabilize and improve our tempo, simply so we don’t lose the next turn or two. Or maybe you’re doing alright, but you notice that your next opponent did 28 and 33 damage to his last two opponents. We’d really like to level, but we’d also really like to not die to the high roller. We wait a turn, and simply tempo up the best we can.
Greeding, we all do it, we all love it. Sometimes you’re getting one of those games where everything is going your way. The shops are great, you’re getting pairs, and you’re winning every fight. Boom you run into a triple. But you’ve got a board full of dragons, and you’d really love to get a Kalecgos instead of a tier 5. In this case you can just level, maybe you’re sacrificing a fight, but you’re increasing your odds to take first place, and you know you’re not going to die, and that you’ll have a power spike the next turn when you pick up the tier 6. Level now and believe in the heart of the cards.
Lastly is simply the shop might be too good or too bad to warrant staying on our normal curve. Say you’re on tier 3 at 9 gold with a full board and a Harvest Golem on board. You were planning on leveling next turn, but all the sudden instead a shop with two Deflecto-Bots, Leaper, and Clunker comes up. It’s simply too good to pass up, buy them all, take the power spike and you’ll be fine to level next turn and probably the turn after with how strong you are. More often it feels like you’re on turn 3, you’ve got one decently poor minion on board and you get a shop with two Wrath Weavers, a Mecharoo, and a Waxrider. You’re facing a Kael’thas next turn. You’re not likely to win, and you’re probably taking the same damage anyways. Here you can sell the minion, level to T3 and enjoy the ride. The tempo you sacrifice isn’t that great by virtue of the poor shop, and we’re just trying to make the best of a bad situation, and putting ourselves in a better position to get lucky later.
In real games you’ll likely deviate from the curve more often then not, but it helps to think of it as your base, and understand why and when you’re deviating. That understanding comes from understanding how to best utilize your hero, understanding tempo, and understanding your resources. Which brings us to our next topic.
Understanding Resources
In Battlegrounds there’s two resources to manage. Gold, obviously, and your HP. Most of what we’ve discussed above is actually rooted in understanding how to manage these resources. The standard curve is based on maximizing gold efficiency while keeping your health as high as possible. This is because it’s focused on buying the maximum amount of minions while still leveling efficiently, allowing you to get stronger minions as you level up. This optimizes your tempo, limiting the amount of wasted gold on rolls or freezes.
» Rolling and Freezing is a Trap
One of the most common traps lower level players fall into is rolling for specific minions, whether it’s a murloc for their murloc board, or a triple too hard. Rolls are expensive. If you look at the standard curve, we don’t typically have excess gold to roll until our 8 gold turn. In a standard curve, you’ll generally only roll 3 times in your first 8 turns. Any excess rolls on any earlier turns will usually prevent you from being gold efficient, resulting either in you playing down a minion or delaying a level. Is that really worth the rolls? As a final point to the price of rolling, we recently had Aranna added as a hero who receives a passive buff after rolling seven times. She’s statistically the worst hero in the game, and that’s with getting a strong buff after rolling seven times. Rolling couldn’t possibly be that good (at the cost of one gold) or she’d be a strong hero. On the other hand, Nozdormu has been a top hero since release, all by simply making your first roll in a turn free. The difference in that one gold is drastic.
Related to rolling is freezing. Each new tavern we see is worth one gold. If you freeze a tavern you’re missing out on seeing a new tavern, which is essentially missing a roll. Since you froze you’re likely buying a minion in the shop you’re freezing. That minion might be worth 3 gold, but would you pay 4 for it? If not it’s probably not worth the freeze. What about when you’re floating a gold, or even two? That minion could be effectively costing you 5 or 6 gold. Some minions are worth that, especially if there’s a strong triple that you cannot get to. But otherwise you’re missing out on potentially better minions, potential triples, etc. We went over the math of why Noz can be a premium hero, just by generally seeing a a few extra minions every game. If you’re freezing too often you’re essentially costing yourself that same advantage.
» Bad Heroes
I said I’d come back to Combat heroes like Lich King and Nefarian. That’s as an example of poor gold efficiency. Along with Aranna they make up the bottom of the tier list. That’s because you’re devoting one gold to their hero powers to improve a single combat phase. You can’t play on a delayed curve like Rafaam because there’s no payout to your delayed leveling. And playing on a standard curve you do not have the excess gold to use the hero power at all. By the time you can use the hero power, they’re simply not effective as using them every turn costs a lot over time and doesn’t provide enough of a permanent board state buff to be viable. It’s not a coincidence that Nefarian, Lich King, and Aranna all promote poor gold efficiency and are all amongst the worst heroes in the game.
» Managing HP
This is pretty straightforward and essentially what was discussed around greedy heroes, and when to deviate from the curve. It’s simply knowing when you are wealthy and healthy (#rhymes) enough to take a hit while being greedy, or when you are poor and need to be a little more frugal with your health. If you are willing to play with your MMR a little, practicing with Patchwerk and Lich Baz’hial can give you a good feel for managing HP, as they both utilize it as a resource more than any other hero.
This wraps up the Tavern portion for now.
Understanding Opponents
One of the main things that lower level players don’t do is check their opponents before each combat phase. Even without deck tracker the game gives you a lot of information about your opponents. How much damage they’ve done to their last two opponents, how many triples they have, their win streak, and a very blurry picture of the sort of comp they have. As it related to deciding if you need to tempo up or if you can greed, checking your opponent typically gives you the answer. If they level you typically want to level as well. If they are on a 5 round win streak doing a lot of damage to opponents, maybe we focus on tempo for the turn. If they’ve been struggling and taking it from everyone, maybe you have the leeway to level aggressively.
Knowing their comp is also vital to shop purchasing decisions and positioning. If someone has a deathrattle comp, you may more specifically look for a Zapp to snipe their Baron. If they’re mechs on tier 4 you might put a bumper in front to break a potential divine shield on their taunt. If they’re murlocs on tier 6 in the late game you might pick up a Ghoul. Juggler demons you might pick up a Battlemaster for a turn to utilize the extra health to soak juggles.
Checking your opponents will have a huge impact on your decisions in the Tavern phase, and those decisions will improve your combat outcomes, specifically in preventing big losses when an opponent is very strong.
Understanding Positioning
Positioning can have a huge impact on combat outcomes. To use a stark example, imagine putting a Baron in the left-most position and a spawn in the right-most position. In most situations that can turn an easy win into a guaranteed loss. Also a note for beginners, attack priority is determined by the player with more minions. If you have have more minions than your opponent, you will attack first, if they have more they will attack first, and if you have the same it will be a coin flip (50/50 chance). This is another reason why playing on curve and not overrolling is important. Attacking first typically benefits you in combat, and making sure you’re not missing out on getting any minions will result in better combat results.
» Trading
As a very general rule, you want to have minions with higher attack to attack first. The reason for this is it improves your trading, as your attacks will be more likely to kill the opponent’s minions. Consider the following example: Two players each have a 6/3 and a 2/4. In one scenario Player A and B both position the 6/3 first. Each has a 25% chance to win, 50% chance to draw, and 25% chance to lose. In the other scenario Player A positions the 6/3 first and Player B positions the 2/4 first. Instead Player A wins 31.25% of the time, and it’s a draw 68.75% of the time, meaning by mispositioning and getting poor trades as a result, Player B gives up 25% chance to win, and loses an additional 6.25% time. (We’re always assuming the opponent is playing optimally, if they’re not it only benefits you.) This is essentially because the 6/3 more frequently survives with 1 hp because the lower attack minion attacks first and cannot kill it. If the 6/3 minion attacks first it will always kill what it attacks. Extracting this logic out further means that by positioning higher attack minions in front you will less frequently allow the opponent good trades where their minions survive on 1 or 2 health.
» Priority
As an even more general rule, you want minions that you want to attack first to attack first. As we just went over usually this is higher attack minions, but there are also any other number of reasons why we’d want other minions to attack first, usually because that minion has an effect on attacking (or on death). Zapp, Glyph Guardian, Macaw, and Cleave, Overkill, and Windfury minions all have additional value when they’re attacking, but not when they’re attacked.
Part of the reason attacking first can be so important is if a Zapp attacks first it can kill a Baron or Juggler before they can have any impact on a fight, if a Macaw attacks first it can trigger free deathrattles before you have a chance to kill anything on their board. A large cleave in front can take out a lot of minions at once, or more reliably snipe the opponents own high priority minions before they can attack or have an impact. Similarly certain deathrattles are important to have go off first, Ghoul to clear an opponent’s divine shields, or a Spawn or Goldrinn to buff as much of your board as possible. Another example of a minion that you would want to attack earlier is something like Deflecto (or formerly Holy Mackerel RIP), so it can lose its divine shield and get a potential reset before accidentally getting sniped later in your order. This is also why you typically position the reset right behind it.
Another concept of priority is minions you want to die later in combat. For obvious reasons you typically want to put these minions further right on your board to delay their attacks as much as possible. Examples of this are minions like Baron, Mama Bear, Murloc Warleader and other minions that have a buffing effect while they’re alive. Other minions that you might want to die later are things like Kangor’s, Boat, or Rat so they can have as many summons as possible. Besides positioning these minions to delay their attacks, there’s one more way you can help these minions stay alive, which brings us to our next topic.
» Taunts
Taunts are severely underrated by lower level players. Taunts are one of the best ways to manipulate the outcomes of battles in ways that favor you because it’s the most you can do to control how your opponents minions attack. They serve a lot of purposes, mostly related to what we discussed above. A taunt soaking attacks means that the minions that you want to have attack priority will more likely get to attack, and your general attack order will be preserved. It also helps keep your other minions alive. The last value is that they serve as cleave protection.
We’ve all been devastated by that cleave that just kills 3 minions in the middle of your order, or snipes your most important minion. Putting a taunt at the far left or usually right (so it stays alive rather than attacking), and a low value minion next to it can protect from a strong potential cleave. You’ll often see a Voidlord or Divine Shield taunt put into unrelated builds to simply provide a two attack taunt for protection. Another benefit with some of these minions is that unbuffed they can be used to play around deathrattles like Nadina in that since they’re forced to attack the smaller taunt it won’t trigger their deathrattle, diminishing value.
Last bit on positioning is just to reiterate and stress the importance of checking your opponents before combat. If they have 5 or 6 dragons you might want to play around Nadina. If they’re Beasts or Mechs you’re more likely going to want to make sure you have cleave protection. If they’re running Baron maybe you focus on trying to get Zapp for a turn.
Understanding the Game Flow
The last thing to understand is a more general game sense aspect. Understanding the game state and the general game flow of the lobby that you’re in. Sometimes you run into a high roller and you know they’re likely to win the lobby. Your priority and focus might shift from trying to win to trying to get a top 4. If a lobby is grindy and filled with players going for top 4, they might not be able to do as much damage to you and you will have more opportunities to play a little greedier and go for a winning build.
Perhaps you’re the high roller, but you have pirates, you might try to play aggressive in getting to 6 and getting high value minions to pace up the lobby and kill people faster, increasing your odds of top 4 and of 1st. Understanding the state of your lobby, should influence how you play, and your goals in each lobby. To climb you’re just trying to get the best finish possible for your game. If you turn a game that you should have gotten top 8 into a 6th place finish you can consider that a win. Playing turn to turn will often get you good finishes, but thinking about the long game in each lobby can help you get to that next level.
Understanding the Meta
The Meta is always changing, so it’s difficult to give lasting advice, but it’s important to understand that the meta shifts can have a huge impact on your play, especially at higher MMRs. If you don’t play according to the meta, you can see huge MMR drops. Sometimes you will have a greedy meta, and picking heroes that can’t take advantage of greeding will not perform as well. In the Lizard meta if you weren’t a hero that could play Lizard well or that could take advantage of leveling against Lizard players you typically didn’t see strong finishes. In the past dominant builds have been Cobalt mechs or big Demons. During those metas you were rewarded for playing those builds and also knowing how to play against them. Knowing the meta also makes it easier to analyze the game state or know what your opponent has before you fight them.
Right now we’re in the middle of a high roll meta that’s a little faster. Eudora and Hooktusk have a lot of high roll potential, and can do a lot of damage when they high roll. Pirates are in every lobby for now (never banned) and they have the potential to do a lot of damage which also paces up lobbies. Lobbies are very big stats oriented, so high roll murlocs have high win potential. If you don’t have a way to deal with big minions with big minions of your own or divine shield poison, you’re unlikely to have a good finish. Understanding these aspects can help inform your decisions and play. And while you won’t climb trying to force the “best build” every game, it definitely helps knowing what that best build is and when to go for it.
Understanding Improvement
Those that are most lucky are those that put themselves in a position to Get Lucky. Like we stated at the beginning, if you’re able to continually put yourselves in good positions to get lucky, you’ll notice yourself getting lucky more often. You can’t win every game of Battlegrounds but you can win more than you lose if you play right.
When you win or lose look back at your game and ask yourself if there was any way you could have played better. Continually look to learn from yourself and others. I’ve learned a lot watching all different levels of streamers. Question their decisions, see what they might be doing wrong, or what they’re thinking of that maybe you weren’t. Keep the mentality that you’re always a scrub and always strive to get better.
That’s the end.
Anyways to that end, closing plug, I am always trying to get better and help others get better on my stream https://www.twitch.tv/PockyPlays. If you want to criticize my play, teach me, or ask me anything feel free to stop by. Also happy to explain any thoughts more in depth on here.
GL HF
You might also be interested in...
- Quick gaming sessions that deliver big entertainment July 20, 2026
Submit your Top 500 Legend Build, be seen by thousands of people!